Getting Started with your Neo FreeRunner/es

From Openmoko

Revision as of 01:34, 5 August 2008 by Mutrox (Talk | contribs)

Jump to: navigation, search


Gracias por comprar esta versión de desarrollo del Neo FreeRunner. El teléfono Neo FreeRunner es la segunda plataforma de hardware pensada para Openmoko. Esta guía te ayudará a conocer tu Neo Freerunner y como empezar a utilizar tu Neo FreeRunner.

Algunas de las Preguntas Mas Frecuentes para nuevos propietarios están contestadas en Getting Started FAQ.

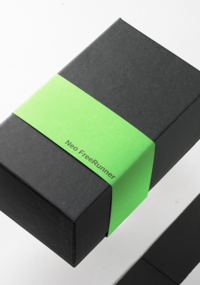
Embalaje Neo FreeRunner


Contents

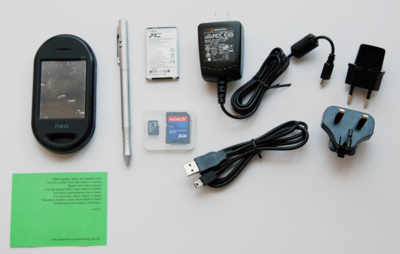
Contenido del Embalaje

Inside the package


Circle2.gif Neo FreeRunner
Circle2.gif Stylus
Circle2.gif Batería
Circle2.gif Cargador
Circle2.gif Cable USB (A -> Mini-B 5-polos)
Circle2.gif Tarjeta microSD 512MB & adaptador SD
 

Configurando el hardware, conociendo físicamente al Neo

Instalando la tarjeta Micro-SD, la tarjeta SIM y la Batería

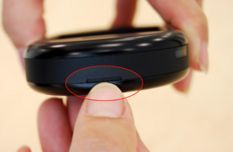
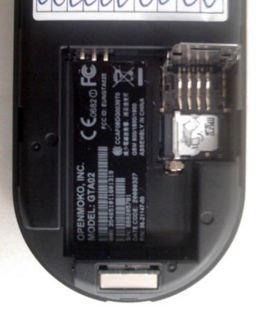
Abre la carcasa de la siguiente manera.
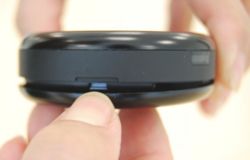
Abriendo !
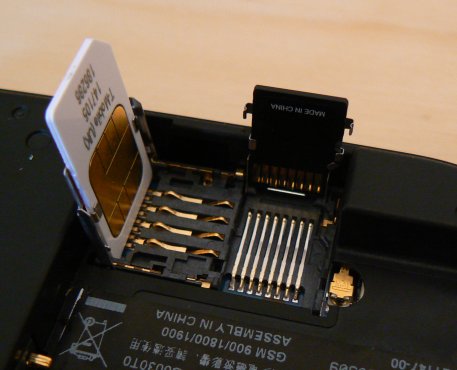
Introduce la tarjeta SIM y la tarjeta Micro-SD aquí.
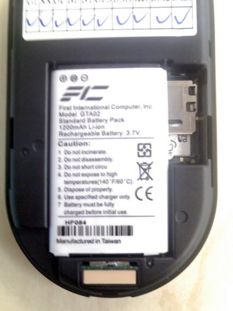
Finalmente coloca la batería.


  1. Quita la carcasa trasera del Neo FreeRunner sujetando el neo por el lateral y usa un uña para separar la parte trasera de parte superior del dispositivo
  2. Ahora deberías poder localizar el porta tarjetas de Sim y Micro-SD en la parte inferior de compartimento de la batería.
  3. Desbloquea el porta tarjetas de la SIM separando el clip metálico con la uña hacia el conector USB. Hazlo con cuidado estas partes son delicadas y pueden ser dañadas si se fuerzan en la dirección equivocada.
  4. Levanta el porta tarjetas SIM.
  5. El porta tarjetas de la Micro-SD esta sujeta por un enganche a cada lado, es mas fácil abrirlo desenganchando un lado cada vez que levantándolo desde el medio, levantándolo desde el medio aumenta la presión de los enganches, un pequeño destornillador o un cuchillo puede ser usado para los enganches.
  6. Inserta la Micro-SD en su porta tarjetas. Date cuenta que el interior de la parte metálica del porta tarjetas hay unas pequeñas pestañas para sujetar la tarjeta.Desliza la tarjeta entre esas pestañas antes de cerrar el porta tarjetas. Fíjate que los contactos eléctricos deben estar hacia abajo y al borde del Neo Freerunner.
  7. Cierra el porta tarjetas de la Micro-SD, asegurando que los dos enganches estén bien fijados.
  8. Inserta la tarjeta SIM en el porta tarjetas SIM, prestando atención en deslizara entre las dos pestañas metálicas. Los contactos deben estar hacia abajo y la esquina biselada debe quedar en la parte del conector del la antena exterior GPS.
  9. Cierra el porta tarjetas SIM y desliza el clip metálico hacia el conector de la antena exterior del GPS del FreeRunner.
  10. Inserta la batería en el su compartimento, alineando los contactos de la batería con los del compartimento. La parte que contiene los contactos se inserta primero.
  11. Recoloca la carcasa trasera del FreeRunner.
Porta tarjetas SIM y SD abierto, con las tarjetas colocadas en su lugar

[Un breve vídeo] también esta disponible. Fue grabado usando la versión anterior del Neo, pero el procedimiento sigue siendo el mismo.

Cargando el Neo FreeRunner

Cuando utilices el Neo FreeRunner la primera vez, deberás cargar la batería completamente. La batería debe ser cargada utilizando el cargador proporcionado( a 1000mA) o desde un puerto USB capaz de proporcionar 500mA de intensidad. La mayoría de PCs son capaces de cargar el FreeRunner sin problemas.

Cargar una batería casi descargada a 100mA tarda 12~15 horas, a 500mA tarda 2,5~3,5 horas, y a 1000mA tarda 1,5~2,5 horas (90%~100%) [pendiente de confirmar]

Asegúrate de NO descargar la batería del todo . Esto puede ser un problema porque el circuito que controla la carga no puede iniciarse hasta que el Neo sea arrancado, y cargar únicamente con corriente desde el USB no funciona. Si alguna vez llega a descargarse completamente, tus opciones son: - Usar un cargador de bateria externo (compatible con modelo de bateria Nokia BL-5C) - Arrancar el FreeRunner con otra batería, conecar al corriente por USB y entonces cambiar con la batería descargada. - Arrancar el FreeRunner con una fuente externa de 4.5 (se requiere experiencia y un gran cuidado), enchufa la corriente USB y inserta la batería descargada.

Botones y conectores

 
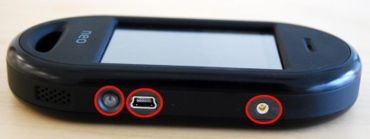
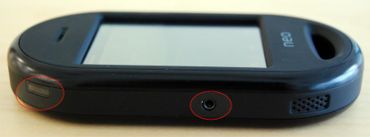
Boton POWER, conexiones USB y antena GPS externa (de derecha a izquierda)
 
Boton AUX y conexion de auriculares (de derecha a izquierda)
POWER

Pulsar brevemente el botón de POWER cierra la aplicación actual.

Mantener pulsado el botón de POWER muestra un menu permitiéndote:

  • Encender y apagar las señales de GPS, wifi, GSM y Bluetooth
  • Cambiar el modo de gestión de energía a:
    • Desconectar pantalla y después bloquear
    • Desconectar pantalla sin bloquear
    • Deshabilitar
  • Bloquear la pantalla
  • Apagar el dispositivo.
AUX

Pulsar brevemente el botón AUX oculta o muestra la aplicación actual.

Mantener pulsado el botón AUX muestra un menú permitiéndote:

  • Ocultar y mostrar la barra de aplicaciones(Modo pantalla completa)
  • Alternar la orientación de la pantalla a lo ancho o a lo alto (Cambio de orientación)
  • Realizar una captura de pantalla y guardarla a una archivo de imagen(Captura de pantalla)

Booting time is 2 about minutes overall, so patience is in order. The longest step comes after the Linux boot messages in very small fonts have scrolled by, at the graphical "openmoko" sunrise page.

The phone jack is a 2.5mm connector with four contacts: stereo + MIC. It is compatible with the headsets used by Motorola smartphones (A780,A1200, ...) and the V-360.

To plug regular (i.e. without microphone) headphones commonly used to listen to music, a compatible 2.5mm 4 rings jack to 3.5mm stereo jack adapter is needed. It has been reported that Nokia's 2.5mm -> 3.5mm adapters do not work, but that a 3.5mm Stereo Audio Adapter for Motorola MPx200/E398 works well. You will also want to switch from speaker output to headset, by restoring the appropriate alsa.state-file (usually the mediaplayer should do this for you) or via alsamixer (see below), to enable stereo output in there.

Unlocking the screen

When the screen is locked, you should see a Matrix-style green graphic with the Openmoko symbol in the middle of the bottom of the screen along with lock and unlock symbols. If you drag the Openmoko symbol to the unlock symbol at the top then the screen will become unlocked.

Navigating menus and applications

Note: this section describes the interface used by the "2007.2" image, which is the current default image for Openmoko.

Today Page

Todaypage reduced true.png
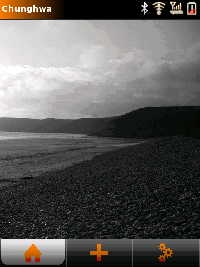
Openmoko starts by displaying the "Today" page, which is your home page. Icons in the top row indicate the status of the phone. The bottom row consists of three tabs. The tab with a home on the left lead to the "Today" page you're viewing now. The central tab lead to the "Launch Task" page, which is the main menu used to start applications. The tab with gears on the right lead to the "Running Tasks" page, which is used to deal with currently open windows and applications.


Todaypage reduced false.png
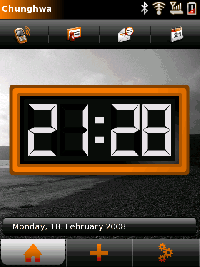
The "Today" page is empty, as shown above, when you first start Openmoko. We explain below how to turn on the "full view", displayed to the right. In the full view, a second row of icons give quick links to commonly-used applications such as the dialer, the adressbook, mailbox and calendar. The main body of the screen displays a clock and other useful information.

See Today/2007.2 for more information about the Today page and customization.


Launch Task Page

Stub: This is a stub. You can help OpenMokoWiki by expanding it.


LaunchTasks.png
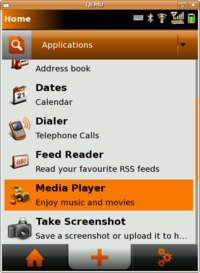
This page displays a menu of available applications. You may choose a category of applications to display to simplify the screen, or choose to display them all.

Current categories are PIM Suite, Applications, Games, Utilities, and All.


Running Tasks Page

Stub: This is a stub. You can help OpenMokoWiki by expanding it.


RunningTasks.png
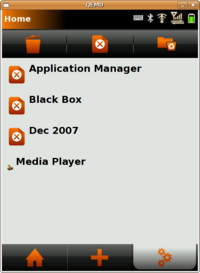
This page displays currently-running tasks. Any individual task may be terminated by selecting it and then clicking on the garbage-can icon to close it. All tasks may be terminated by clicking on any one of them and then clicking on the "folder" icon in the upper right (expect this to change in future releases). Any task may be rejoined by selecting it and then selecting the "return" icon at the middle top.


Exiting from and switching to an Application

Any time an application is running, you can simply click the device's power button and the application will exit, returning you to the Today page.

Alternatively, you can cycle through active applications using the AUX button

Clicking the top-left of the screen displays the drop down task menu. This menu lists all active applications and allows to switch directly to any one. Note: If the task menu is not shown, click and hold the Aux button to bring up the Aux menu, and select "Toggle Fullscreen".

Using the terminal

To start a console from "Today" page, click the middle tab at the bottom of the screen to display the "Launch applications" page, then select Terminal in the "Applications" submenu. The multitaps keyboard slides up (and down) from the bottom of the screen automatically when you touch the screen.

Setting date and time

From the terminal, type the following, but replace MM with the month (01-12); DD with the day (01-31); hhmm with the time (0000-2359); YYYY with the year (optional); and .ss with the seconds (optional).

date -s MMDDhhmmYYYY.ss

To make the change persist between reboots, sync the hardware clock with the updated system time.

hwclock --systohc

See Setting Date and Time for more discussion, including synchronizing with an NTP server.

Adjusting the Volume

As of this writing, there is no way to adjust the volume from the screen.

For now, run the terminal application or log in via usb, and run the Neo alsamixer application (to see all the options, including Mic2, you will need to run alsamixer -V all). The mixer is simpler than it looks. Just use the left and right arrow keys to select "headphone" or "PCM" and use the up and down arrow keys to adjust the volume. You can also adjust your microphone volume with the "mic2" adjustment. Press ESC when finished. Then exit the terminal application or log out of the USB login.

You may need to update configuration files in /usr/share/openmoko/scenarios/ to make the microphone setting permanent. Use

alsactl -f path-to-statefile store

to do this.

The default files are as follows (in /usr/share/openmoko/scenarios/):

gsmhandset.state
gsmheadset.state
gsmspeakerout.state
headset.state
stereoout.state

These correspond to the various Sound Profiles accessible in the Debug Tool under Applications.

To manually restore one of the state files,

alsactl -f path-to-statefile restore

One way to increase the volume of the microphone is to do the following:

  1. ssh into your Freerunner
  2. vi /usr/share/openmoko/scenarios/gsmhandset.state
  3. search for "Mic2"
  4. change to "value 3"

If people report not being able to hear you when you call, then setting the Mic2 value to 2 or 3 should fix that.

Question: I am using headphones but only the right speaker work the left don't work how can I fix this ?

R: This should be set correctly by restoring gsmheadset.state. Pull and replug the headset jack to make sure the correct state-file is restored. To manually control the switch between Speaker and headset: Start alsamixer, scroll along to the right until you find "Amp Spk" and mute it (m), the sound will then come out from both channels of the headphones and not out of the speaker.

Freerunner_Hardware_Issues

Accessing the microSD card

Mounted at /media/card by default.

If you have multiple partitions on the card, the first (/dev/mmcblk0p1) will be mounted at /media/card, the second at /media/mmcblk0p2, the third at /media/mmcblk0p3 etc.

Set up USB-based networking and update

Connect with and log in the Neo FreeRunner

This is discussed in the USB Networking section.

Use the package manager

There are three layers to the software on the FreeRunner:

  • uBoot: Think of u-boot as a combination of the BIOS and Grub on a PC.
  • Kernel: The Linux kernel
  • Root Filesystem: The rest of the system

In order to keep the FreeRunner up-to-date with the latest features and bug-fixes, it is advisable update the software at regular intervals. There are two main methods of doing this: upgrading with the package manager opkg or manually flashing the device. For now using the package manager is enough, you don't want to learn about Booting the Neo FreeRunner and Flashing the Neo FreeRunner yet.

uboot, the kernel and the root filesystem can all be flashed to update them. For uboot, this is the only possibility. The advantage of flashing the kernel manually rather than using opkg seems to be speed. The disadvantage of flashing the root file system is that it wipes out all local modifications, including /home. If /home is moved to the SD disk, this is no longer a problem.

Warning: UPGRADING TO DAILY KERNELS FROM THE DEVELOPMENT BRANCH MAY BREAK THINGS. That said, assuming that your FreeRunner can access the internet (see above), the kernel and other packages can be updated with

# opkg update
# opkg -test upgrade
# opkg upgrade

The first updates the repository information, telling opkg what packages are available. The second allows you to see what the package manager wants to do. The third upgrades all packages for which a newer version is available. At the moment, some signature files are missing (404 errors), which opkg complains about, but this is cosmetic. The repositories will still update with the missing signature files.

Note that running opkg upgrade on a factory-fresh phone will upgrade dropbear (the ssh software) and various xserver packages, and neither upgrades elegantly while in use. Xserver must be updated over ssh to complete succesfully. Dropbear can be updated over ssh with the proper command:

# nohup opkg upgrade dropbear & 

Or upgrade it directly in the FreeRunner terminal.

# opkg upgrade dropbear

When updating over ssh, the session will be interrupted, but the command should complete successfully(check nohup.out on your device to verify), and you should be able to reconnect within a few seconds.

Then connect to the FreeRunner via ssh and type:

# opkg upgrade

Alternatively you can upgrade the xserver packages via ssh and then upgrade the rest from the FreeRunner's terminal.

If you do your first upgrade in two installments like this, it will go more smoothly.

It will be possible in the future to update uboot with opkg, but this has not yet been implemented.

Installing multimedia, web browsing and other applications

There are many applications you can install - check out the Repositories for a list of packages, an example of how to add a repository using scaredy cat as an example can also be found here. A list of pre-installed and available packages with descriptions can be found here - Available Packages.

The calendar can be installed with

opkg install openmoko-dates2

For a Media Player:

opkg install openmoko-mediaplayer2
wget http://abraxa.dyndns.org:81/random/openmoko-mediaplayer-theme.tar.bz2
tar xjf openmoko-mediaplayer-theme.tar.bz2 -C /usr/share/themes/Moko/gtk-2.0
rm openmoko-mediaplayer-theme.tar.bz2

If you want a basic image viewer, have a look at the one from the gpe suite:

opkg install gpe-icons 
opkg install gpe-gallery

To obtain the standard web browser, use:

opkg install openmoko-browser2

An alternative browser, minimo, offers many more features. First download and unpack it on your GNU/Linux host:

wget http://www.ginguppin.de/files/minimo.tar.bz2
tar jvxf minimo.tar.bz2

Copy it over to the FreeRunner:

scp minimo_* root@192.168.0.202:/tmp

Then on the FreeRunner:

opkg install /tmp/minimo_0.02\+cvs20070626-r0_armv4t.ipk

You'll probably also want to change the keyboard including the keyboard toggle applet

Importing contacts

If you can export your contacts to VCard format, either multiple files or single file containing all of them, you may use the script on Import Vcf Contacts page to bring them to Neo.

The next steps

Congratulations for setting up your Neo FreeRunner. There are many more ressources to help free your phone:

Customize the interface

home screen clock, keyboard

The stock Openmoko2007.2 image flashed onto the Neo FreeRunner is really just the bare bones. For example, you don't have the clock and the quick-launch icons showing. Here's how you can change that:

# dbus-launch gconftool-2 -t boolean -s /desktop/poky/interface/reduced false
# /etc/init.d/xserver-nodm restart

If you rather have a regular clock instead of the digital one, do this instead:

# dbus-launch gconftool-2 -t boolean -s /desktop/poky/interface/reduced false
# dbus-launch gconftool-2 -t boolean -s /desktop/poky/interface/digital_clock false
# /etc/init.d/xserver-nodm restart

REMOVE CLICK SOUND VIA /etc/pulse/session

More information about today screen customization at Today/2007.2.

Also, if you prefer having a full keyboard, using matchbox's qwerty keybord, see these instructions. Then you may also see these, which describe a way to add an applet allowing the showing/hiding of that keyboard.

Use the GPS

Simple guide to get going with GPS:

# opkg install gpsd
# echo "GPS_DEV=\"/dev/ttySAC1\"" > /etc/default/gpsd

and restart gpsd, the gps daemon, with

# /etc/init.d/gpsd restart

To test GPS, you can use agpsui:

# opkg install openmoko-agpsui

For a nice map, try tangoGPS:

# opkg install http://www.tangogps.org/downloads/tangogps_0.9.2-r1_armv4t.ipk

There were critical GPS Problems earlier that are largely fixed in newest kernels, see the instructions above to install the updates. More information is on the GPS page.

Play with WLAN, GPRS and Bluetooth

There are plenty of development opportunities to integrate these functions in the OpenMoko software.

WLAN: See GTA02 WLAN

GPRS: See Manually using GPRS

Bluetooth: See Manually using Bluetooth

Welcome in the community

The release of the Freerunner in the summer 2008 has led the community into a new period of rapid growth. The ressources available are summarized on the Openmoko:Community_Portal. These are always exciting and interesting times to live in when the balance between Chaos and Order tilts towards change.

As an entry point, the [openmoko community mailing list] is perhaps the most active. As of July 2008, its volume amounts to dozens of messages per day. Openmoko people are there too. You may ask for help on the [support mailing list].

Or if you use IRC, there is always a good group in the channel #openmoko on FreeNode.

The links on the top-right of this page lead to the sister sites in the Openmoko community:

  • Home and Wiki lead to the same Main Page on the wiki. It needs cleaning, we know...
  • Doc leads to the bug Tracking system.
  • Planet goes to the collection of Openmoko-relatd blogs.
  • Projects is the GForge, free hosting for application developers.
  • Lists is the listing of all the public mailing lists on lists.openmoko.org.

Annotated references

To search this wiki with Google, use the following search term:

<search term> site:http://wiki.openmoko.org/wiki/
Personal tools
Key pages on:
Neo FreeRunner


Gracias por comprar esta versión de desarrollo del Neo FreeRunner. El teléfono Neo FreeRunner es la segunda plataforma de hardware pensada para Openmoko. Esta guía te ayudará a conocer tu Neo Freerunner y como empezar a utilizar tu Neo FreeRunner.

Algunas de las Preguntas Mas Frecuentes para nuevos propietarios están contestadas en Getting Started FAQ.

Embalaje Neo FreeRunner


Contenido del Embalaje

Inside the package


Circle2.gif Neo FreeRunner
Circle2.gif Stylus
Circle2.gif Batería
Circle2.gif Cargador
Circle2.gif Cable USB (A -> Mini-B 5-polos)
Circle2.gif Tarjeta microSD 512MB & adaptador SD
 

Configurando el hardware, conociendo físicamente al Neo

Instalando la tarjeta Micro-SD, la tarjeta SIM y la Batería

Abre la carcasa de la siguiente manera.
Abriendo !
Introduce la tarjeta SIM y la tarjeta Micro-SD aquí.
Finalmente coloca la batería.


  1. Quita la carcasa trasera del Neo FreeRunner sujetando el neo por el lateral y usa un uña para separar la parte trasera de parte superior del dispositivo
  2. Ahora deberías poder localizar el porta tarjetas de Sim y Micro-SD en la parte inferior de compartimento de la batería.
  3. Desbloquea el porta tarjetas de la SIM separando el clip metálico con la uña hacia el conector USB. Hazlo con cuidado estas partes son delicadas y pueden ser dañadas si se fuerzan en la dirección equivocada.
  4. Levanta el porta tarjetas SIM.
  5. El porta tarjetas de la Micro-SD esta sujeta por un enganche a cada lado, es mas fácil abrirlo desenganchando un lado cada vez que levantándolo desde el medio, levantándolo desde el medio aumenta la presión de los enganches, un pequeño destornillador o un cuchillo puede ser usado para los enganches.
  6. Inserta la Micro-SD en su porta tarjetas. Date cuenta que el interior de la parte metálica del porta tarjetas hay unas pequeñas pestañas para sujetar la tarjeta.Desliza la tarjeta entre esas pestañas antes de cerrar el porta tarjetas. Fíjate que los contactos eléctricos deben estar hacia abajo y al borde del Neo Freerunner.
  7. Cierra el porta tarjetas de la Micro-SD, asegurando que los dos enganches estén bien fijados.
  8. Inserta la tarjeta SIM en el porta tarjetas SIM, prestando atención en deslizara entre las dos pestañas metálicas. Los contactos deben estar hacia abajo y la esquina biselada debe quedar en la parte del conector del la antena exterior GPS.
  9. Cierra el porta tarjetas SIM y desliza el clip metálico hacia el conector de la antena exterior del GPS del FreeRunner.
  10. Inserta la batería en el su compartimento, alineando los contactos de la batería con los del compartimento. La parte que contiene los contactos se inserta primero.
  11. Recoloca la carcasa trasera del FreeRunner.
Porta tarjetas SIM y SD abierto, con las tarjetas colocadas en su lugar

[Un breve vídeo] también esta disponible. Fue grabado usando la versión anterior del Neo, pero el procedimiento sigue siendo el mismo.

Cargando el Neo FreeRunner

Cuando utilices el Neo FreeRunner la primera vez, deberás cargar la batería completamente. La batería debe ser cargada utilizando el cargador proporcionado( a 1000mA) o desde un puerto USB capaz de proporcionar 500mA de intensidad. La mayoría de PCs son capaces de cargar el FreeRunner sin problemas.

Cargar una batería casi descargada a 100mA tarda 12~15 horas, a 500mA tarda 2,5~3,5 horas, y a 1000mA tarda 1,5~2,5 horas (90%~100%) [pendiente de confirmar]

Asegúrate de NO descargar la batería del todo . Esto puede ser un problema porque el circuito que controla la carga no puede iniciarse hasta que el Neo sea arrancado, y cargar únicamente con corriente desde el USB no funciona. Si alguna vez llega a descargarse completamente, tus opciones son: - Usar un cargador de bateria externo (compatible con modelo de bateria Nokia BL-5C) - Arrancar el FreeRunner con otra batería, conecar al corriente por USB y entonces cambiar con la batería descargada. - Arrancar el FreeRunner con una fuente externa de 4.5 (se requiere experiencia y un gran cuidado), enchufa la corriente USB y inserta la batería descargada.

Botones y conectores

 
Boton POWER, conexiones USB y antena GPS externa (de derecha a izquierda)
 
Boton AUX y conexion de auriculares (de derecha a izquierda)
POWER

Pulsar brevemente el botón de POWER cierra la aplicación actual.

Mantener pulsado el botón de POWER muestra un menu permitiéndote:

  • Encender y apagar las señales de GPS, wifi, GSM y Bluetooth
  • Cambiar el modo de gestión de energía a:
    • Desconectar pantalla y después bloquear
    • Desconectar pantalla sin bloquear
    • Deshabilitar
  • Bloquear la pantalla
  • Apagar el dispositivo.
AUX

Pulsar brevemente el botón AUX oculta o muestra la aplicación actual.

Mantener pulsado el botón AUX muestra un menú permitiéndote:

  • Ocultar y mostrar la barra de aplicaciones(Modo pantalla completa)
  • Alternar la orientación de la pantalla a lo ancho o a lo alto (Cambio de orientación)
  • Realizar una captura de pantalla y guardarla a una archivo de imagen(Captura de pantalla)

Booting time is 2 about minutes overall, so patience is in order. The longest step comes after the Linux boot messages in very small fonts have scrolled by, at the graphical "openmoko" sunrise page.

The phone jack is a 2.5mm connector with four contacts: stereo + MIC. It is compatible with the headsets used by Motorola smartphones (A780,A1200, ...) and the V-360.

To plug regular (i.e. without microphone) headphones commonly used to listen to music, a compatible 2.5mm 4 rings jack to 3.5mm stereo jack adapter is needed. It has been reported that Nokia's 2.5mm -> 3.5mm adapters do not work, but that a 3.5mm Stereo Audio Adapter for Motorola MPx200/E398 works well. You will also want to switch from speaker output to headset, by restoring the appropriate alsa.state-file (usually the mediaplayer should do this for you) or via alsamixer (see below), to enable stereo output in there.

Unlocking the screen

When the screen is locked, you should see a Matrix-style green graphic with the Openmoko symbol in the middle of the bottom of the screen along with lock and unlock symbols. If you drag the Openmoko symbol to the unlock symbol at the top then the screen will become unlocked.

Navigating menus and applications

Note: this section describes the interface used by the "2007.2" image, which is the current default image for Openmoko.

Today Page

Todaypage reduced true.png
Openmoko starts by displaying the "Today" page, which is your home page. Icons in the top row indicate the status of the phone. The bottom row consists of three tabs. The tab with a home on the left lead to the "Today" page you're viewing now. The central tab lead to the "Launch Task" page, which is the main menu used to start applications. The tab with gears on the right lead to the "Running Tasks" page, which is used to deal with currently open windows and applications.


Todaypage reduced false.png
The "Today" page is empty, as shown above, when you first start Openmoko. We explain below how to turn on the "full view", displayed to the right. In the full view, a second row of icons give quick links to commonly-used applications such as the dialer, the adressbook, mailbox and calendar. The main body of the screen displays a clock and other useful information.

See Today/2007.2 for more information about the Today page and customization.


Launch Task Page

Stub: This is a stub. You can help OpenMokoWiki by expanding it.


LaunchTasks.png
This page displays a menu of available applications. You may choose a category of applications to display to simplify the screen, or choose to display them all.

Current categories are PIM Suite, Applications, Games, Utilities, and All.


Running Tasks Page

Stub: This is a stub. You can help OpenMokoWiki by expanding it.


RunningTasks.png
This page displays currently-running tasks. Any individual task may be terminated by selecting it and then clicking on the garbage-can icon to close it. All tasks may be terminated by clicking on any one of them and then clicking on the "folder" icon in the upper right (expect this to change in future releases). Any task may be rejoined by selecting it and then selecting the "return" icon at the middle top.


Exiting from and switching to an Application

Any time an application is running, you can simply click the device's power button and the application will exit, returning you to the Today page.

Alternatively, you can cycle through active applications using the AUX button

Clicking the top-left of the screen displays the drop down task menu. This menu lists all active applications and allows to switch directly to any one. Note: If the task menu is not shown, click and hold the Aux button to bring up the Aux menu, and select "Toggle Fullscreen".

Using the terminal

To start a console from "Today" page, click the middle tab at the bottom of the screen to display the "Launch applications" page, then select Terminal in the "Applications" submenu. The multitaps keyboard slides up (and down) from the bottom of the screen automatically when you touch the screen.

Setting date and time

From the terminal, type the following, but replace MM with the month (01-12); DD with the day (01-31); hhmm with the time (0000-2359); YYYY with the year (optional); and .ss with the seconds (optional).

date -s MMDDhhmmYYYY.ss

To make the change persist between reboots, sync the hardware clock with the updated system time.

hwclock --systohc

See Setting Date and Time for more discussion, including synchronizing with an NTP server.

Adjusting the Volume

As of this writing, there is no way to adjust the volume from the screen.

For now, run the terminal application or log in via usb, and run the Neo alsamixer application (to see all the options, including Mic2, you will need to run alsamixer -V all). The mixer is simpler than it looks. Just use the left and right arrow keys to select "headphone" or "PCM" and use the up and down arrow keys to adjust the volume. You can also adjust your microphone volume with the "mic2" adjustment. Press ESC when finished. Then exit the terminal application or log out of the USB login.

You may need to update configuration files in /usr/share/openmoko/scenarios/ to make the microphone setting permanent. Use

alsactl -f path-to-statefile store

to do this.

The default files are as follows (in /usr/share/openmoko/scenarios/):

gsmhandset.state
gsmheadset.state
gsmspeakerout.state
headset.state
stereoout.state

These correspond to the various Sound Profiles accessible in the Debug Tool under Applications.

To manually restore one of the state files,

alsactl -f path-to-statefile restore

One way to increase the volume of the microphone is to do the following:

  1. ssh into your Freerunner
  2. vi /usr/share/openmoko/scenarios/gsmhandset.state
  3. search for "Mic2"
  4. change to "value 3"

If people report not being able to hear you when you call, then setting the Mic2 value to 2 or 3 should fix that.

Question: I am using headphones but only the right speaker work the left don't work how can I fix this ?

R: This should be set correctly by restoring gsmheadset.state. Pull and replug the headset jack to make sure the correct state-file is restored. To manually control the switch between Speaker and headset: Start alsamixer, scroll along to the right until you find "Amp Spk" and mute it (m), the sound will then come out from both channels of the headphones and not out of the speaker.

Freerunner_Hardware_Issues

Accessing the microSD card

Mounted at /media/card by default.

If you have multiple partitions on the card, the first (/dev/mmcblk0p1) will be mounted at /media/card, the second at /media/mmcblk0p2, the third at /media/mmcblk0p3 etc.

Set up USB-based networking and update

Connect with and log in the Neo FreeRunner

This is discussed in the USB Networking section.

Use the package manager

There are three layers to the software on the FreeRunner:

  • uBoot: Think of u-boot as a combination of the BIOS and Grub on a PC.
  • Kernel: The Linux kernel
  • Root Filesystem: The rest of the system

In order to keep the FreeRunner up-to-date with the latest features and bug-fixes, it is advisable update the software at regular intervals. There are two main methods of doing this: upgrading with the package manager opkg or manually flashing the device. For now using the package manager is enough, you don't want to learn about Booting the Neo FreeRunner and Flashing the Neo FreeRunner yet.

uboot, the kernel and the root filesystem can all be flashed to update them. For uboot, this is the only possibility. The advantage of flashing the kernel manually rather than using opkg seems to be speed. The disadvantage of flashing the root file system is that it wipes out all local modifications, including /home. If /home is moved to the SD disk, this is no longer a problem.

Warning: UPGRADING TO DAILY KERNELS FROM THE DEVELOPMENT BRANCH MAY BREAK THINGS. That said, assuming that your FreeRunner can access the internet (see above), the kernel and other packages can be updated with

# opkg update
# opkg -test upgrade
# opkg upgrade

The first updates the repository information, telling opkg what packages are available. The second allows you to see what the package manager wants to do. The third upgrades all packages for which a newer version is available. At the moment, some signature files are missing (404 errors), which opkg complains about, but this is cosmetic. The repositories will still update with the missing signature files.

Note that running opkg upgrade on a factory-fresh phone will upgrade dropbear (the ssh software) and various xserver packages, and neither upgrades elegantly while in use. Xserver must be updated over ssh to complete succesfully. Dropbear can be updated over ssh with the proper command:

# nohup opkg upgrade dropbear & 

Or upgrade it directly in the FreeRunner terminal.

# opkg upgrade dropbear

When updating over ssh, the session will be interrupted, but the command should complete successfully(check nohup.out on your device to verify), and you should be able to reconnect within a few seconds.

Then connect to the FreeRunner via ssh and type:

# opkg upgrade

Alternatively you can upgrade the xserver packages via ssh and then upgrade the rest from the FreeRunner's terminal.

If you do your first upgrade in two installments like this, it will go more smoothly.

It will be possible in the future to update uboot with opkg, but this has not yet been implemented.

Installing multimedia, web browsing and other applications

There are many applications you can install - check out the Repositories for a list of packages, an example of how to add a repository using scaredy cat as an example can also be found here. A list of pre-installed and available packages with descriptions can be found here - Available Packages.

The calendar can be installed with

opkg install openmoko-dates2

For a Media Player:

opkg install openmoko-mediaplayer2
wget http://abraxa.dyndns.org:81/random/openmoko-mediaplayer-theme.tar.bz2
tar xjf openmoko-mediaplayer-theme.tar.bz2 -C /usr/share/themes/Moko/gtk-2.0
rm openmoko-mediaplayer-theme.tar.bz2

If you want a basic image viewer, have a look at the one from the gpe suite:

opkg install gpe-icons 
opkg install gpe-gallery

To obtain the standard web browser, use:

opkg install openmoko-browser2

An alternative browser, minimo, offers many more features. First download and unpack it on your GNU/Linux host:

wget http://www.ginguppin.de/files/minimo.tar.bz2
tar jvxf minimo.tar.bz2

Copy it over to the FreeRunner:

scp minimo_* root@192.168.0.202:/tmp

Then on the FreeRunner:

opkg install /tmp/minimo_0.02\+cvs20070626-r0_armv4t.ipk

You'll probably also want to change the keyboard including the keyboard toggle applet

Importing contacts

If you can export your contacts to VCard format, either multiple files or single file containing all of them, you may use the script on Import Vcf Contacts page to bring them to Neo.

The next steps

Congratulations for setting up your Neo FreeRunner. There are many more ressources to help free your phone:

Customize the interface

home screen clock, keyboard

The stock Openmoko2007.2 image flashed onto the Neo FreeRunner is really just the bare bones. For example, you don't have the clock and the quick-launch icons showing. Here's how you can change that:

# dbus-launch gconftool-2 -t boolean -s /desktop/poky/interface/reduced false
# /etc/init.d/xserver-nodm restart

If you rather have a regular clock instead of the digital one, do this instead:

# dbus-launch gconftool-2 -t boolean -s /desktop/poky/interface/reduced false
# dbus-launch gconftool-2 -t boolean -s /desktop/poky/interface/digital_clock false
# /etc/init.d/xserver-nodm restart

REMOVE CLICK SOUND VIA /etc/pulse/session

More information about today screen customization at Today/2007.2.

Also, if you prefer having a full keyboard, using matchbox's qwerty keybord, see these instructions. Then you may also see these, which describe a way to add an applet allowing the showing/hiding of that keyboard.

Use the GPS

Simple guide to get going with GPS:

# opkg install gpsd
# echo "GPS_DEV=\"/dev/ttySAC1\"" > /etc/default/gpsd

and restart gpsd, the gps daemon, with

# /etc/init.d/gpsd restart

To test GPS, you can use agpsui:

# opkg install openmoko-agpsui

For a nice map, try tangoGPS:

# opkg install http://www.tangogps.org/downloads/tangogps_0.9.2-r1_armv4t.ipk

There were critical GPS Problems earlier that are largely fixed in newest kernels, see the instructions above to install the updates. More information is on the GPS page.

Play with WLAN, GPRS and Bluetooth

There are plenty of development opportunities to integrate these functions in the OpenMoko software.

WLAN: See GTA02 WLAN

GPRS: See Manually using GPRS

Bluetooth: See Manually using Bluetooth

Welcome in the community

The release of the Freerunner in the summer 2008 has led the community into a new period of rapid growth. The ressources available are summarized on the Openmoko:Community_Portal. These are always exciting and interesting times to live in when the balance between Chaos and Order tilts towards change.

As an entry point, the [openmoko community mailing list] is perhaps the most active. As of July 2008, its volume amounts to dozens of messages per day. Openmoko people are there too. You may ask for help on the [support mailing list].

Or if you use IRC, there is always a good group in the channel #openmoko on FreeNode.

The links on the top-right of this page lead to the sister sites in the Openmoko community:

  • Home and Wiki lead to the same Main Page on the wiki. It needs cleaning, we know...
  • Doc leads to the bug Tracking system.
  • Planet goes to the collection of Openmoko-relatd blogs.
  • Projects is the GForge, free hosting for application developers.
  • Lists is the listing of all the public mailing lists on lists.openmoko.org.

Annotated references

To search this wiki with Google, use the following search term:

<search term> site:http://wiki.openmoko.org/wiki/