U-Boot/zh tw

From Openmoko

Revision as of 13:08, 28 April 2008 by Coolcat (Talk | contribs)

Jump to: navigation, search
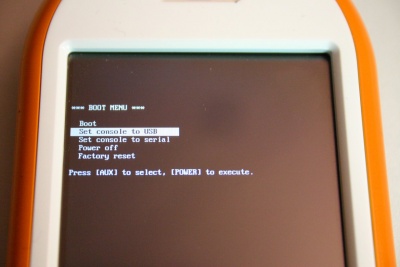
u-boot menu on Neo1973
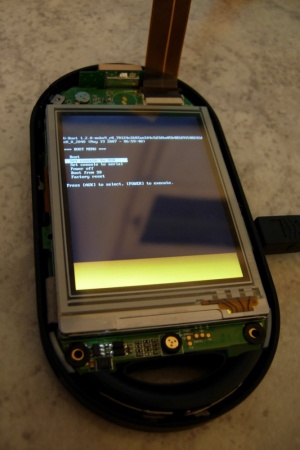
u-boot splash screen on Neo1973

Neo1973上的bootloader-- U-Boot ,負責硬體裝置的功能運作,直到 Openmoko被啟動載入裝置為止。這包括用來更新OpenmokUSB DFU、螢幕顯示、啟動選單、bootloader 指令列控制台、透過 bootloader 環境設定及載入kernel等。

有不同的bootloader版本可供使用:

Contents

Phase0 快速啟動

  • 請確認你的電話是目前是裝好電池,並且USB接線至少移開30秒以上。
  • 利用USB接線,連接Neo (ie 並不是偵錯板) 到Linux主機。
  • 在啟動電源時,按住AUX 按鈕以存取選單。
  • 將控制台設定為USB
  • 在Linux主機上利用「終端機」連接到/dev/ttyACM0 (你可能會用到chown uucp.uucp /dev/ttyACM0 )
  • 請注意cdc_acm /dev/ttyACM0 存取會連同Neo boots一起消失,它會被cdc_ether usb0網路存取取代。
  • 你現在會進入bootloader 提示指令下。
  • 如果你希望在每次啟動時都停留在bootloader,將bootdelay uboot 環境變數設定為-1 。

一般

GTA01 使用u-boot bootloader.

關於u-boot的更多資訊,可以參考下列網址:

您也可以參考下面的內容,得到其它u-boot的資訊:

  • 使用S3C2410 Steppingstone支援從NAND 中啟動
  • 支援S3C2410 NAND flash
  • 支援透過S3C2410 USB 裝置控制器下載程式
  • 支援在S3C2410 Framebuffer中顯示啟動logo / 狀態

然而,u-boot並不會支援GTA01所需要的功能,如

  • 支援從SD/Transflash讀取kernel/initrd

HaraldWelte目前正在進行這項工作,事實上,已完成大部份的工作。

Bootloader 源碼

目前的bootloader patches 可以在下面的位置取得: http://svn.openmoko.org/trunk/src/target/u-boot/patches/.

將源碼解壓縮縮,套用到patch,執行"make gta01bv3_config" (或gta01bv2_config, 或你擁有的任何硬體版本),執行"make"。你將會得到"u-boot.bin" 映像檔,你可以在NAND中直接更新(也可以使用現有的bootloader 或 sjf2410-linux)。


Bootloader 二進位檔

最新的bootloader 二進位檔可以在以下的位置中找到under http://buildhost.openmoko.org/snapshots in the subdirectory 200X.XX/images/。它應該被寫入NAND 0x00000000的位置 (大小為0x30000) (第一個分割區partition).

開發Bootloader

QT2410

如果你想要在QT2410上開發bootloader,使用bootloader 映像檔更新會從USB上下載到RAM來的簡單的多。 要進行這項工作,你必須編輯u-boot/include/configs/qt2410.h 檔案,並且將第32行程式中的"if 0"變更為 "if 1",之後再使用"make"重新編譯。

產生的"u-boot.bin" 檔案對於NAND記憶體並不穩定,但卻可以直接或在RAM中執行,如透過使用s3c2410_boot_usb 程式。

GTA01

在GTA01上開發bootloader是很辣手的一件事情,首先,我們並不會有任何的NOR記憶體。第二,並沒有其它的方法可以不從NAND中啟動。然而,我們也不會有一個像QT2410一樣的USB下載器。

最主要的問題是: S3C2410 Steppingstone內部的SRAM的前4K並沒有被限制。SRAM 分割並非絕對性的對應到實體0的位置。我們要如何因應呢?

使用JTAG 自RAM中啟動

那我們要如何自RAM啟動?我們使用JTAG / OpenOCD 進行:

  • 在PC=0的時候重設及暫停CPU
> reset halt
target halted in ARM state due to debug request, current mode: Supervisor
cpsr: 0x400000d3 pc: 0x00000000
MMU: disabled, D-Cache: disabled, I-Cache: disabled
  • 針對低階SDRAM啟動下載程式片段(做為4k的sram的踏腳石)
> load_binary /space/misc/gta01/u-boot.git/board/gta01/lowlevel_foo.bin 0            
downloaded 332 byte in 0s 21899us
  • 在0x33f80000插入中斷點 (能指出低階程式已完成)
> bp 0x33f80000 4 hw
breakpoint added at address 0x33f80000
  • 執行程式到中斷點
> resume
Target 0 resumed
> Target 0 halted
target halted in ARM state due to breakpoint, current mode: Supervisor
cpsr: 0x600000d3 pc: 0x33f80000
MMU: disabled, D-Cache: disabled, I-Cache: enabled
  • 下載u-boot RAM映像檔到0x33f80000
> load_binary /space/misc/gta01/u-boot.git/u-boot.bin 0x33f80000
downloaded 135692 byte in 6s 567264us
  • 繼續處理
> resume
Target 0 resumed

在進行到這裡時,顯示的背光會變明亮,我們會看到下面的指令:

U-Boot 1.1.6 (Jan 13 2007 - 23:44:23)

DRAM:  128 MB
NAND:  64 MiB
*** Warning - bad CRC or NAND, using default environment

In:    serial
Out:   serial
Err:   serial
Hit any key to stop autoboot:  0 
GTA01Bv2 # 

建立可啟動的映像檔

u-boot 需要可啟動的映像檔 (如kernels,也包括 initrd 及其它內容) ,形成所謂的uImage。為了建立uImage,如從vmlinux kernel 映像檔,你可以進行下面的處理:

objcopy -O binary -R .note -R .comment -S vmlinux linux.bin
gzip -9 linux.bin
u-boot/tools/mkimage -A arm -O linux -T kernel -C gzip -a 30008000 -e 30008000 -n "Kernel Image QT2410" -d linux.bin.gz uImage

啟動選單

u-boot boot menu on Neo1973

從Phase-0 釋出後,我們的u-boot版本現在放在以螢幕顯示的啟動選單中,選單中的項目被定義在環境選單輸入中。

存取啟動選單

你可以在啟動電話時,藉由按下Neo1973 AUX Button 及電源按鈕來存取選單。

使用啟動選單

藉由按下Neo1973 AUX Button 你可以循環使用選單項目。使用POWER按鈕選取其中的項目。

Bootloader 命令提示

存取bootloader的命令提示

bootloader 命令提示可以在序列控制台上進行 (透過Debug Board) 或者是虛擬USB 序列裝置(USB CDC_ACM)。 不論是序列埠或usb,都依照stdinstdoutstderr u-boot 環境變數而定。

不論你是否使用usbtty,前面的訊息會在序列控制台中顯示。bootloader 目前被設定為三秒鐘的等待時間。如果在 三秒內,stdin中收到鍵入的訊息,自動啟動就會被取消掉。

自Linux中使用usbtty

藉由在u-boot模式下連接電話到Linux 主機上,它會讓它偵測到 CDC ACM 裝置,你會擁有一個名為/dev/ttyACM0的新tty裝置。若沒有的話,請啟用CONFIG_USB_ACM (Device Drivers -> USB support -> USB Modem (CDC ACM) support)。 (MacOS 的使用者請參考這裡取得更多資訊)

使用你熟悉的模擬器 (minicom, cu, zc, screen ...) 像使用任何序列埠般存取。如果你並沒有熟悉的模擬器,可以試試看: (位於taylor-uucp 中的cu,使用"apt-get 安裝 cu" 如果它還未安裝話。

cu -l /dev/ttyACM0

你會需要用到

chown uucp.uucp /dev/ttyACM0

取得必要的權限(甚至是root)

A nice alternative for cu is Werner Almesberger's neocon.

First, you should try to check whether the USB device shows up in 'lsusb' while you're running in u-boot mode:

# lsusb -d 1457:5119
Bus 005 Device 079: ID 1457:5119  

Second, lets see some more details about the available endpoints and configurations:

# lsusb -v -d 1457:5119
Bus 005 Device 079: ID 1457:5119  
Device Descriptor:
  bLength                18
  bDescriptorType         1
  bcdUSB               1.10
  bDeviceClass            2 Communications
  bDeviceSubClass         0 
  bDeviceProtocol         0 
  bMaxPacketSize0        16
  idVendor           0x1457 
  idProduct          0x5119 
  bcdDevice            0.00
  iManufacturer           1 OpenMoko, Inc
  iProduct                2 Neo1973 Bootloader U-Boot 1.2.0-g6c7cac8c-dirty-moko3
  iSerial                 3 0000000
  bNumConfigurations      1
  Configuration Descriptor:
    bLength                 9
    bDescriptorType         2
    wTotalLength           85
    bNumInterfaces          3
    bConfigurationValue     1
    iConfiguration          4 TTY via USB
    bmAttributes         0xc0
      Self Powered
    MaxPower                0mA
    Interface Descriptor:
      bLength                 9
      bDescriptorType         4
      bInterfaceNumber        0
      bAlternateSetting       0
      bNumEndpoints           1
      bInterfaceClass         2 Communications
      bInterfaceSubClass      2 Abstract (modem)
      bInterfaceProtocol      1 AT-commands (v.25ter)
      iInterface              6 Control Interface
      CDC Header:
        bcdCDC               0.6e
      CDC Call Management:
        bmCapabilities       0x00
        bDataInterface          1
      CDC ACM:
        bmCapabilities       0x00
      CDC Union:
        bMasterInterface        0
        bSlaveInterface         1 
      Endpoint Descriptor:
        bLength                 7
        bDescriptorType         5
        bEndpointAddress     0x81  EP 1 IN
        bmAttributes            3
          Transfer Type            Interrupt
          Synch Type               None
          Usage Type               Data
        wMaxPacketSize     0x0010  1x 16 bytes
        bInterval             255
    Interface Descriptor:
      bLength                 9
      bDescriptorType         4
      bInterfaceNumber        1
      bAlternateSetting       0
      bNumEndpoints           2
      bInterfaceClass        10 CDC Data
      bInterfaceSubClass      0 Unused
      bInterfaceProtocol      0 
      iInterface              5 Bulk Data Interface
      Endpoint Descriptor:
        bLength                 7
        bDescriptorType         5
        bEndpointAddress     0x02  EP 2 OUT
        bmAttributes            2
          Transfer Type            Bulk
          Synch Type               None
          Usage Type               Data
        wMaxPacketSize     0x0010  1x 16 bytes
        bInterval             255
      Endpoint Descriptor:
        bLength                 7
        bDescriptorType         5
        bEndpointAddress     0x83  EP 3 IN
        bmAttributes            2
          Transfer Type            Bulk
          Synch Type               None
          Usage Type               Data
        wMaxPacketSize     0x0010  1x 16 bytes
        bInterval             255
    Interface Descriptor:
      bLength                 9
      bDescriptorType         4
      bInterfaceNumber        2
      bAlternateSetting       0
      bNumEndpoints           0
      bInterfaceClass       254 Application Specific Interface
      bInterfaceSubClass      1 Device Firmware Update
      bInterfaceProtocol      1 
      iInterface              7 USB Device Firmware Upgrade
Device Status:     0x0001
  Self Powered

Next, you can access it using your favourite terminal program.

Then, if the environment is not set correctly, you will need to use the current console (e.g. serial console) to change the console entries in the environment:

GTA01Bv2 # setenv stderr usbtty
GTA01Bv2 # setenv stdout usbtty
GTA01Bv2 # setenv stdin usbtty

Typical u-boot prompt

U-Boot 1.2.0-moko1 (Feb 16 2007 - 00:36:13)

DRAM:  128 MB
NAND:  64 MiB
Found Environment offset in OOB..
Video: 640x480x8 31kHz 59Hz
USB:   S3C2410 USB Deviced
In:    serial
Out:   serial
Err:   serial
Hit any key to stop autoboot:  0 
GTA01Bv3 #

Commands on the bootloader prompt

See bootloader commands.


Device Firmware Upgrade

Our version of u-boot also implements USB DFU. This can be useful to load files and kernel for quick testing.

To find out whether your version of u-boot supports this, use the output of

$ lsusb -v -d 1457:5119

while the phone is in u-boot mode.

If it supports DFU, you should see the following snippet towards the end of the output:

    Interface Descriptor:
      bLength                 9
      bDescriptorType         4
      bInterfaceNumber        2
      bAlternateSetting       0
      bNumEndpoints           0
      bInterfaceClass       254 Application Specific Interface
      bInterfaceSubClass      1 Device Firmware Update
      bInterfaceProtocol      1 
      iInterface              0 

For information on how to do firmware upgrades, please see dfu-util.

Booting files over DFU

To load a file at memory address 0x32000000:

dfu-util -a 0 -D fileToLoad -R

After that, send 'bootm 0x32000000' to u-boot or 'bootelf 0x32000000' if its an elf file.

Simple python script that can boot an ELF image - avoiding a ACM bug that breaks on large packets.

#!/usr/bin/python
import sys
import os
import time

cmd1 = "neo backlight off\n"
cmd2 = "bootelf 0x32000000\n"

def output(tty, str):
    for x in str:
        tty.write(x)
        tty.flush()

if len(sys.argv) == 2:
    print "Loading %s..." % sys.argv[1]

    loadfile = "dfu-util -a 0 -D %s -R" % sys.argv[1]

    os.system(loadfile)

    time.sleep(3)

    tty = open("/dev/ttyACM0", "a")

    output(tty, cmd1)
    output(tty, cmd2)

    tty.close()
else:
    print "Usage: %s elffile" % sys.argv[0]
    print ""
    sys.exit(2)

Troubleshooting

USB connectivity problems

I once got errors like this (in dmesg or /var/log/messages) on the host side while connecting the neo in u-boot:

usb 2-1: device descriptor read/64, error -110
usb usb2: Controller not stopped yet!

The problem disappeared at least for me by the command below on the host side. Please note that if you have usb keyboard or mouse then the command might cause trouble.. I only have PS/2 so I couldn't test it.

rmmod uhci_hcd ; modprobe uhci_hcd
Personal tools
u-boot menu on Neo1973
u-boot splash screen on Neo1973

Neo1973上的bootloader-- U-Boot ,負責硬體裝置的功能運作,直到 Openmoko被啟動載入裝置為止。這包括用來更新OpenmokUSB DFU、螢幕顯示、啟動選單、bootloader 指令列控制台、透過 bootloader 環境設定及載入kernel等。

有不同的bootloader版本可供使用:

Phase0 快速啟動

  • 請確認你的電話是目前是裝好電池,並且USB接線至少移開30秒以上。
  • 利用USB接線,連接Neo (ie 並不是偵錯板) 到Linux主機。
  • 在啟動電源時,按住AUX 按鈕以存取選單。
  • 將控制台設定為USB
  • 在Linux主機上利用「終端機」連接到/dev/ttyACM0 (你可能會用到chown uucp.uucp /dev/ttyACM0 )
  • 請注意cdc_acm /dev/ttyACM0 存取會連同Neo boots一起消失,它會被cdc_ether usb0網路存取取代。
  • 你現在會進入bootloader 提示指令下。
  • 如果你希望在每次啟動時都停留在bootloader,將bootdelay uboot 環境變數設定為-1 。

一般

GTA01 使用u-boot bootloader.

關於u-boot的更多資訊,可以參考下列網址:

您也可以參考下面的內容,得到其它u-boot的資訊:

  • 使用S3C2410 Steppingstone支援從NAND 中啟動
  • 支援S3C2410 NAND flash
  • 支援透過S3C2410 USB 裝置控制器下載程式
  • 支援在S3C2410 Framebuffer中顯示啟動logo / 狀態

然而,u-boot並不會支援GTA01所需要的功能,如

  • 支援從SD/Transflash讀取kernel/initrd

HaraldWelte目前正在進行這項工作,事實上,已完成大部份的工作。

Bootloader 源碼

目前的bootloader patches 可以在下面的位置取得: http://svn.openmoko.org/trunk/src/target/u-boot/patches/.

將源碼解壓縮縮,套用到patch,執行"make gta01bv3_config" (或gta01bv2_config, 或你擁有的任何硬體版本),執行"make"。你將會得到"u-boot.bin" 映像檔,你可以在NAND中直接更新(也可以使用現有的bootloader 或 sjf2410-linux)。


Bootloader 二進位檔

最新的bootloader 二進位檔可以在以下的位置中找到under http://buildhost.openmoko.org/snapshots in the subdirectory 200X.XX/images/。它應該被寫入NAND 0x00000000的位置 (大小為0x30000) (第一個分割區partition).

開發Bootloader

QT2410

如果你想要在QT2410上開發bootloader,使用bootloader 映像檔更新會從USB上下載到RAM來的簡單的多。 要進行這項工作,你必須編輯u-boot/include/configs/qt2410.h 檔案,並且將第32行程式中的"if 0"變更為 "if 1",之後再使用"make"重新編譯。

產生的"u-boot.bin" 檔案對於NAND記憶體並不穩定,但卻可以直接或在RAM中執行,如透過使用s3c2410_boot_usb 程式。

GTA01

在GTA01上開發bootloader是很辣手的一件事情,首先,我們並不會有任何的NOR記憶體。第二,並沒有其它的方法可以不從NAND中啟動。然而,我們也不會有一個像QT2410一樣的USB下載器。

最主要的問題是: S3C2410 Steppingstone內部的SRAM的前4K並沒有被限制。SRAM 分割並非絕對性的對應到實體0的位置。我們要如何因應呢?

使用JTAG 自RAM中啟動

那我們要如何自RAM啟動?我們使用JTAG / OpenOCD 進行:

  • 在PC=0的時候重設及暫停CPU
> reset halt
target halted in ARM state due to debug request, current mode: Supervisor
cpsr: 0x400000d3 pc: 0x00000000
MMU: disabled, D-Cache: disabled, I-Cache: disabled
  • 針對低階SDRAM啟動下載程式片段(做為4k的sram的踏腳石)
> load_binary /space/misc/gta01/u-boot.git/board/gta01/lowlevel_foo.bin 0            
downloaded 332 byte in 0s 21899us
  • 在0x33f80000插入中斷點 (能指出低階程式已完成)
> bp 0x33f80000 4 hw
breakpoint added at address 0x33f80000
  • 執行程式到中斷點
> resume
Target 0 resumed
> Target 0 halted
target halted in ARM state due to breakpoint, current mode: Supervisor
cpsr: 0x600000d3 pc: 0x33f80000
MMU: disabled, D-Cache: disabled, I-Cache: enabled
  • 下載u-boot RAM映像檔到0x33f80000
> load_binary /space/misc/gta01/u-boot.git/u-boot.bin 0x33f80000
downloaded 135692 byte in 6s 567264us
  • 繼續處理
> resume
Target 0 resumed

在進行到這裡時,顯示的背光會變明亮,我們會看到下面的指令:

U-Boot 1.1.6 (Jan 13 2007 - 23:44:23)

DRAM:  128 MB
NAND:  64 MiB
*** Warning - bad CRC or NAND, using default environment

In:    serial
Out:   serial
Err:   serial
Hit any key to stop autoboot:  0 
GTA01Bv2 # 

建立可啟動的映像檔

u-boot 需要可啟動的映像檔 (如kernels,也包括 initrd 及其它內容) ,形成所謂的uImage。為了建立uImage,如從vmlinux kernel 映像檔,你可以進行下面的處理:

objcopy -O binary -R .note -R .comment -S vmlinux linux.bin
gzip -9 linux.bin
u-boot/tools/mkimage -A arm -O linux -T kernel -C gzip -a 30008000 -e 30008000 -n "Kernel Image QT2410" -d linux.bin.gz uImage

啟動選單

u-boot boot menu on Neo1973

從Phase-0 釋出後,我們的u-boot版本現在放在以螢幕顯示的啟動選單中,選單中的項目被定義在環境選單輸入中。

存取啟動選單

你可以在啟動電話時,藉由按下Neo1973 AUX Button 及電源按鈕來存取選單。

使用啟動選單

藉由按下Neo1973 AUX Button 你可以循環使用選單項目。使用POWER按鈕選取其中的項目。

Bootloader 命令提示

存取bootloader的命令提示

bootloader 命令提示可以在序列控制台上進行 (透過Debug Board) 或者是虛擬USB 序列裝置(USB CDC_ACM)。 不論是序列埠或usb,都依照stdinstdoutstderr u-boot 環境變數而定。

不論你是否使用usbtty,前面的訊息會在序列控制台中顯示。bootloader 目前被設定為三秒鐘的等待時間。如果在 三秒內,stdin中收到鍵入的訊息,自動啟動就會被取消掉。

自Linux中使用usbtty

藉由在u-boot模式下連接電話到Linux 主機上,它會讓它偵測到 CDC ACM 裝置,你會擁有一個名為/dev/ttyACM0的新tty裝置。若沒有的話,請啟用CONFIG_USB_ACM (Device Drivers -> USB support -> USB Modem (CDC ACM) support)。 (MacOS 的使用者請參考這裡取得更多資訊)

使用你熟悉的模擬器 (minicom, cu, zc, screen ...) 像使用任何序列埠般存取。如果你並沒有熟悉的模擬器,可以試試看: (位於taylor-uucp 中的cu,使用"apt-get 安裝 cu" 如果它還未安裝話。

cu -l /dev/ttyACM0

你會需要用到

chown uucp.uucp /dev/ttyACM0

取得必要的權限(甚至是root)

A nice alternative for cu is Werner Almesberger's neocon.

First, you should try to check whether the USB device shows up in 'lsusb' while you're running in u-boot mode:

# lsusb -d 1457:5119
Bus 005 Device 079: ID 1457:5119  

Second, lets see some more details about the available endpoints and configurations:

# lsusb -v -d 1457:5119
Bus 005 Device 079: ID 1457:5119  
Device Descriptor:
  bLength                18
  bDescriptorType         1
  bcdUSB               1.10
  bDeviceClass            2 Communications
  bDeviceSubClass         0 
  bDeviceProtocol         0 
  bMaxPacketSize0        16
  idVendor           0x1457 
  idProduct          0x5119 
  bcdDevice            0.00
  iManufacturer           1 OpenMoko, Inc
  iProduct                2 Neo1973 Bootloader U-Boot 1.2.0-g6c7cac8c-dirty-moko3
  iSerial                 3 0000000
  bNumConfigurations      1
  Configuration Descriptor:
    bLength                 9
    bDescriptorType         2
    wTotalLength           85
    bNumInterfaces          3
    bConfigurationValue     1
    iConfiguration          4 TTY via USB
    bmAttributes         0xc0
      Self Powered
    MaxPower                0mA
    Interface Descriptor:
      bLength                 9
      bDescriptorType         4
      bInterfaceNumber        0
      bAlternateSetting       0
      bNumEndpoints           1
      bInterfaceClass         2 Communications
      bInterfaceSubClass      2 Abstract (modem)
      bInterfaceProtocol      1 AT-commands (v.25ter)
      iInterface              6 Control Interface
      CDC Header:
        bcdCDC               0.6e
      CDC Call Management:
        bmCapabilities       0x00
        bDataInterface          1
      CDC ACM:
        bmCapabilities       0x00
      CDC Union:
        bMasterInterface        0
        bSlaveInterface         1 
      Endpoint Descriptor:
        bLength                 7
        bDescriptorType         5
        bEndpointAddress     0x81  EP 1 IN
        bmAttributes            3
          Transfer Type            Interrupt
          Synch Type               None
          Usage Type               Data
        wMaxPacketSize     0x0010  1x 16 bytes
        bInterval             255
    Interface Descriptor:
      bLength                 9
      bDescriptorType         4
      bInterfaceNumber        1
      bAlternateSetting       0
      bNumEndpoints           2
      bInterfaceClass        10 CDC Data
      bInterfaceSubClass      0 Unused
      bInterfaceProtocol      0 
      iInterface              5 Bulk Data Interface
      Endpoint Descriptor:
        bLength                 7
        bDescriptorType         5
        bEndpointAddress     0x02  EP 2 OUT
        bmAttributes            2
          Transfer Type            Bulk
          Synch Type               None
          Usage Type               Data
        wMaxPacketSize     0x0010  1x 16 bytes
        bInterval             255
      Endpoint Descriptor:
        bLength                 7
        bDescriptorType         5
        bEndpointAddress     0x83  EP 3 IN
        bmAttributes            2
          Transfer Type            Bulk
          Synch Type               None
          Usage Type               Data
        wMaxPacketSize     0x0010  1x 16 bytes
        bInterval             255
    Interface Descriptor:
      bLength                 9
      bDescriptorType         4
      bInterfaceNumber        2
      bAlternateSetting       0
      bNumEndpoints           0
      bInterfaceClass       254 Application Specific Interface
      bInterfaceSubClass      1 Device Firmware Update
      bInterfaceProtocol      1 
      iInterface              7 USB Device Firmware Upgrade
Device Status:     0x0001
  Self Powered

Next, you can access it using your favourite terminal program.

Then, if the environment is not set correctly, you will need to use the current console (e.g. serial console) to change the console entries in the environment:

GTA01Bv2 # setenv stderr usbtty
GTA01Bv2 # setenv stdout usbtty
GTA01Bv2 # setenv stdin usbtty

Typical u-boot prompt

U-Boot 1.2.0-moko1 (Feb 16 2007 - 00:36:13)

DRAM:  128 MB
NAND:  64 MiB
Found Environment offset in OOB..
Video: 640x480x8 31kHz 59Hz
USB:   S3C2410 USB Deviced
In:    serial
Out:   serial
Err:   serial
Hit any key to stop autoboot:  0 
GTA01Bv3 #

Commands on the bootloader prompt

See bootloader commands.


Device Firmware Upgrade

Our version of u-boot also implements USB DFU. This can be useful to load files and kernel for quick testing.

To find out whether your version of u-boot supports this, use the output of

$ lsusb -v -d 1457:5119

while the phone is in u-boot mode.

If it supports DFU, you should see the following snippet towards the end of the output:

    Interface Descriptor:
      bLength                 9
      bDescriptorType         4
      bInterfaceNumber        2
      bAlternateSetting       0
      bNumEndpoints           0
      bInterfaceClass       254 Application Specific Interface
      bInterfaceSubClass      1 Device Firmware Update
      bInterfaceProtocol      1 
      iInterface              0 

For information on how to do firmware upgrades, please see dfu-util.

Booting files over DFU

To load a file at memory address 0x32000000:

dfu-util -a 0 -D fileToLoad -R

After that, send 'bootm 0x32000000' to u-boot or 'bootelf 0x32000000' if its an elf file.

Simple python script that can boot an ELF image - avoiding a ACM bug that breaks on large packets.

#!/usr/bin/python
import sys
import os
import time

cmd1 = "neo backlight off\n"
cmd2 = "bootelf 0x32000000\n"

def output(tty, str):
    for x in str:
        tty.write(x)
        tty.flush()

if len(sys.argv) == 2:
    print "Loading %s..." % sys.argv[1]

    loadfile = "dfu-util -a 0 -D %s -R" % sys.argv[1]

    os.system(loadfile)

    time.sleep(3)

    tty = open("/dev/ttyACM0", "a")

    output(tty, cmd1)
    output(tty, cmd2)

    tty.close()
else:
    print "Usage: %s elffile" % sys.argv[0]
    print ""
    sys.exit(2)

Troubleshooting

USB connectivity problems

I once got errors like this (in dmesg or /var/log/messages) on the host side while connecting the neo in u-boot:

usb 2-1: device descriptor read/64, error -110
usb usb2: Controller not stopped yet!

The problem disappeared at least for me by the command below on the host side. Please note that if you have usb keyboard or mouse then the command might cause trouble.. I only have PS/2 so I couldn't test it.

rmmod uhci_hcd ; modprobe uhci_hcd