Manuals/Om 2007.2

From Openmoko

Revision as of 22:23, 14 November 2011 by Quix0r (Talk | contribs)

(diff) ← Older revision | Latest revision (diff) | Newer revision → (diff)
Jump to: navigation, search

Please notice it is strongly recommended to update to any recent distro (probably the first thing you should do with your FR after some hours of drooling and playing), as the info herein is completely out of date, as is the software this is about. See Distributions

Contents

Navigating menus and applications

Today Page

Todaypage reduced true.png
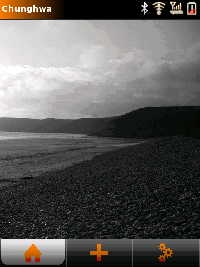
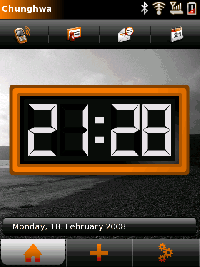
Openmoko starts by displaying the "Today" page, which is your home page. Icons in the top row indicate the status of the phone. The bottom row consists of three tabs. The tab with a house on the left leads to the "Today" page you're viewing now. The central tab leads to the "Launch Task" page, which is the main menu used to start applications. The tab with gears on the right leads to the "Running Tasks" page, which is used to deal with currently open windows and applications.


Todaypage reduced false.png
The "Today" page is empty, as shown above, when you first start Openmoko. We explain below how to turn on the "full view", displayed to the right. In the full view, a second row of icons give quick links to commonly-used applications such as the dialer, the adressbook, mailbox and calendar. The main body of the screen displays a clock and other useful information.

See Today/2007.2 for more information about the Today page and customization.


Launch Task Page

Stub: This is a stub. You can help OpenMokoWiki by expanding it.


LaunchTasks.png
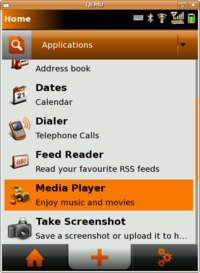
This page displays a menu of available applications. You may choose a category of applications to display to simplify the screen, or choose to display them all.

Current categories are [PIM Suite], Applications, Games, Utilities, and All.


Running Tasks Page

Stub: This is a stub. You can help OpenMokoWiki by expanding it.


RunningTasks.png
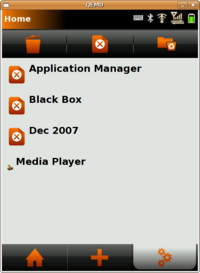
This page displays currently-running tasks. Any individual task may be terminated by selecting it and then clicking on the garbage-can icon to close it. All tasks may be terminated by clicking on any one of them and then clicking on the "folder" icon in the upper right (expect this to change in future releases). Any task may be rejoined by selecting it and then selecting the "return" icon at the middle top.


Exiting from and switching to an Application

Any time an application is running, you can simply click the device's power button and the application will exit, returning you to the Today page.

Alternatively, you can cycle through active applications using the AUX button

Clicking the top-left of the screen displays the drop down task menu. This menu lists all active applications and allows to switch directly to any one. Note: If the task menu is not shown, click and hold the Aux button to bring up the Aux menu, and select "Toggle Fullscreen".

Using the terminal

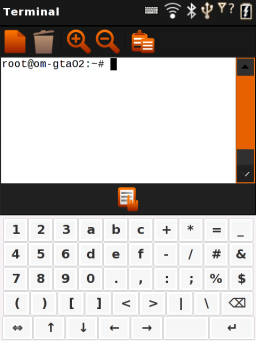
To start a console from "Today" page, click the middle tab at the bottom of the screen to display the "Launch applications" page, then select Terminal in the "Applications" submenu. The multitaps keyboard slides up (and down) from the bottom of the screen automatically when you touch the screen.

Setting date and time

From the terminal, type the following, but replace MM with the month (01-12); DD with the day (01-31); hhmm with the time (0000-2359); YYYY with the year (optional); and .ss with the seconds (optional).

date -s MMDDhhmmYYYY.ss

To make the change persist between reboots, sync the hardware clock with the updated system time.

hwclock --systohc

See Setting Date and Time for more discussion, including synchronizing with an NTP server.

Note: UNIX traditionally sets the system clock to GMT (UTC) or "Zulu" (Z time zone). So I use the stanza:

date -u MMDDhhmmYYYY.ss (well, I usually ignore the seconds)

Then I can set the local time using the techniques described elsewhere. iceworm

Accessing the microSD card

Mounted at /media/card by default.

 mount /media/card

If you have multiple partitions on the card, the first (/dev/mmcblk0p1) will be mounted at /media/card, the second at /media/mmcblk0p2, the third at /media/mmcblk0p3 etc. To setup the package management to write on the microSD card when installing new software follow the package management guide.

fox example :

Filesystem           1k-blocks      Used Available Use% Mounted on
rootfs                  252544    153560     98984  61% /
/dev/root               252544    153560     98984  61% /
/dev/root               252544    153560     98984  61% /dev/.static/dev
udev                      2048        76      1972   4% /dev
/dev/mmcblk0p1            3362      1794      1568  53% /media/card
/dev/mmcblk0p2          476382    157368    294419  35% /media/mmcblk0p2
tmpfs                    61928       380     61548   1% /var/volatile
tmpfs                    61928         0     61928   0% /dev/shm

Switching Keyboards

Fix default

Due to a bug, the default keyboard supplied on the 2007.2 doesn't allow you to enter the "/" or "\" characters, which should be on the same key (0?) as "+". You can instead add these characters to other keys, in this example ">" and "/" are added to the 1 key. You may also insert the tab character \t, which provides tab completion. The | character may also be useful. Edit /etc/multitap-pad/im-multipress.conf:

[keys]
KP_0 = +;=;/;\\
KP_1 = .;,;/;>;-;?;!;@;:;(;)
KP_2 = a;b;c;2
KP_3 = d;e;f;3
KP_4 = g;h;i;4
KP_5 = j;k;l;5;\t
KP_6 = m;n;o;6
KP_7 = p;q;r;s;7
KP_8 = t;u;v;8
KP_9 = w;x;y;z;9
KP_10 = A;B;C;2
KP_11 = D;E;F;3
KP_12 = G;H;I;4
KP_13 = J;K;L;5
KP_14 = M;N;O;6
KP_15 = P;Q;R;S;7
KP_16 = T;U;V;8
KP_17 = W;X;Y;Z;9

The buggy key is KP_0 in the above file.

The ; character is also missing. You can add this character by adding ;\; to any of the lines above.

Matchbox keyboard

Another keyboard is available: matchbox-keyboard. It is a full QWERTY keyboard. This howto is based on a blog entry which can be found here

Considerations

Pros:

  • All keys can be generated
  • Takes up less space than the keypad (multitap-pad), leaving more space for the application

Cons:

  • You pretty much have to use a stylus. With difficulty you can hit keys with the corner of a fingernail.

How to install it?

ScaredyCat release (http://buildhost.automated.it/OM2007.2/) or others distributions, use the following:

opkg remove -force-depends multitap-pad
opkg install matchbox-keyboard-inputmethod
opkg install matchbox-keyboard-im
opkg install matchbox-keyboard-applet

Otherwise, you'll have to download the ipk files from here. Assuming you have a working internet connection on your FreeRunner, you can do the following:

cd /tmp
mkdir matchbox-keyboard
cd matchbox-keyboard
wget http://www.ginguppin.de/files/keyboard-ipk.tar.bz2
tar -jxf keyboard-ipk.tar.bz2
opkg remove -force-depends multitap-pad
opkg install matchbox-keyboard-inputmethod*.ipk
opkg install matchbox-keyboard-im*.ipk
opkg install matchbox-keyboard-applet*.ipk
cd ..
rm -rf matchbox-keyboard

After that you'll have to restart the X server:

/etc/init.d/xserver-nodm restart

How to add a keyboard toggle button

To add a button to enable showing / hiding the keyboard, edit /etc/matchbox/session. In the list of applets after --end-applets, add keyboard, and restart your X server

How to switch between matchbox-keyboard and multitap-pad

If you want to keep the multitap keyboard, but also be able to start up the matchbox-keyboard, you can follow these ugly instructions:

First you must install matchbox-keyboard.

opkg install matchbox-keyboard

Do the following (from the terminal or an ssh session with DISPLAY=:0.0):

killall multitap-pad
matchbox-keyboard > /dev/null 2>&1 &

(If you type the above commands with multitap, you have to leave off the redirection of matchbox-keyboard output, since several of the keys you need are missing.)

Caveats: When you start the matchbox-keyboard, it stays up all the time. This will (among other things) prevent you from unlocking, since the keyboard covers the openmoko logo at the bottom of the lock screen. You will need to:

  1. nohup multitap-pad -d &
  2. killall matchbox-keyboard

to close it down, and at least get the matchbox keyboard going again. You should do that any time you're going to leave the neo alone for any length of time, so you can unlock it later.

To make sure you don't end up removing all your keyboard input capability, you can create a new .desktop file in /usr/share/applications/ for starting and closing the keyboard. This is pretty easy to do by copying and editing an existing .desktop file.

Modified Matchbox Keyboard: finger friendly

There is a modified Matchbox keyboard available on http://wiki.harnir.net/openmoko:keyboard-compressed . The keyboard can be controlled without stylus and also includes everything needed for terminal-use.

Installation

Download one of the files below, uncompress and put it in /usr/share/matchbox-keyboard/ on your Neo FreeRunner:

 * general keyboard layout DEAD LINK
 * Polish keyboard layout DEAD LINK

If you want, you can change the name of the file to keyboard.xml or make a symlink to it. This way, matchbox-keyboard will use it automatically after next restart of the X server.

Note: I've installed keyboard layout from [[1]] before making this one. Please inform me if my layout works without these modifications, or if they are needed.

How does it look like?

Default layout

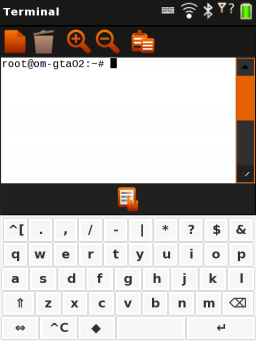
Matchbox-keyboard-general.png

 * ^[ - Escape
 * ⇑ - Shift
 * ⌫ - Backspace
 * ⇔ - switch layout to the alternate
 * ^C - Control
 * ◆ - write a digit or symbol
 * ↵ - Enter

Default Polish layout

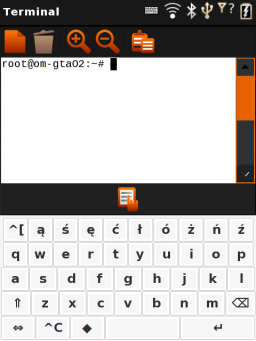
Matchbox-keyboard-pl.png

Shifted Polish layout

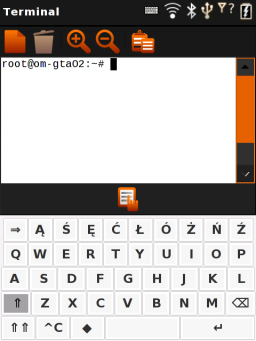
Matchbox-keyboard-pl-caps.png

 * ⇒ - Tab
 * ⇑⇑ - Caps Lock

If you use general layout, special characters from the top row stay the same in the shifted layout.

Digits and symbols

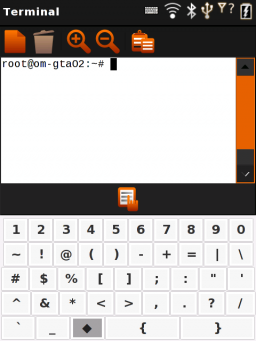
Matchbox-keyboard-symbols.png

When you select a desired key in this layout, keyboard immediately returns back to the alphabet keys.

Alternate keyboard layout

Matchbox-keyboard-alternate.png

This layout is "persistent" - when you select a key it won't disappear by itself - you need to use the <key>⇔</key> key in the bottom-left corner of the keyboard to return to the default keyboard.

Alternate layout is meant for easy writing of medium or long numbers (decimal or hex, hence the A-F letters), IP and MAC addresses, RGB values, etc. You can find here also direction keys (↑, ↓, ←, →) for easier movement operations.

Switch back to the original Openmoko keypad

If you for whatever reason need to switch back, here are the steps:

opkg remove matchbox-keyboard-inputmethod matchbox-keyboard-im matchbox-keyboard-applet
opkg install multitap-pad

Comment or delete the following lines in /etc/gtk-2.0/gtk.immodules :

#"/usr/lib/gtk-2.0/2.10.0/immodules/libmb-im-invoker.so"
#"matchbox-im-invoker" "Virtual Keyboard" "" "" "*"

Now restart the xserver:

/etc/init.d/xserver-nodm restart

Turning off the boot sound

To stop the boot sound playing simply edit /etc/pulse/session. Look near the bottom of the file, you should see something like:

# Load samples
load-sample startup /usr/share/openmoko/sounds/startup_openmoko.wav
load-sample touchscreen /usr/share/openmoko/sounds/touchscreen_click.wav


To disable the boot sound and/or the touchscreen tap sound simply place a # at the start of the line, ie:

# Load samples
#load-sample startup /usr/share/openmoko/sounds/startup_openmoko.wav
#load-sample touchscreen /usr/share/openmoko/sounds/touchscreen_click.wav


If you want to change the sound, simply change the .wav file name to something else.

Personal tools

Please notice it is strongly recommended to update to any recent distro (probably the first thing you should do with your FR after some hours of drooling and playing), as the info herein is completely out of date, as is the software this is about. See Distributions

Navigating menus and applications

Today Page

Todaypage reduced true.png
Openmoko starts by displaying the "Today" page, which is your home page. Icons in the top row indicate the status of the phone. The bottom row consists of three tabs. The tab with a house on the left leads to the "Today" page you're viewing now. The central tab leads to the "Launch Task" page, which is the main menu used to start applications. The tab with gears on the right leads to the "Running Tasks" page, which is used to deal with currently open windows and applications.


Todaypage reduced false.png
The "Today" page is empty, as shown above, when you first start Openmoko. We explain below how to turn on the "full view", displayed to the right. In the full view, a second row of icons give quick links to commonly-used applications such as the dialer, the adressbook, mailbox and calendar. The main body of the screen displays a clock and other useful information.

See Today/2007.2 for more information about the Today page and customization.


Launch Task Page

Stub: This is a stub. You can help OpenMokoWiki by expanding it.


LaunchTasks.png
This page displays a menu of available applications. You may choose a category of applications to display to simplify the screen, or choose to display them all.

Current categories are [PIM Suite], Applications, Games, Utilities, and All.


Running Tasks Page

Stub: This is a stub. You can help OpenMokoWiki by expanding it.


RunningTasks.png
This page displays currently-running tasks. Any individual task may be terminated by selecting it and then clicking on the garbage-can icon to close it. All tasks may be terminated by clicking on any one of them and then clicking on the "folder" icon in the upper right (expect this to change in future releases). Any task may be rejoined by selecting it and then selecting the "return" icon at the middle top.


Exiting from and switching to an Application

Any time an application is running, you can simply click the device's power button and the application will exit, returning you to the Today page.

Alternatively, you can cycle through active applications using the AUX button

Clicking the top-left of the screen displays the drop down task menu. This menu lists all active applications and allows to switch directly to any one. Note: If the task menu is not shown, click and hold the Aux button to bring up the Aux menu, and select "Toggle Fullscreen".

Using the terminal

To start a console from "Today" page, click the middle tab at the bottom of the screen to display the "Launch applications" page, then select Terminal in the "Applications" submenu. The multitaps keyboard slides up (and down) from the bottom of the screen automatically when you touch the screen.

Setting date and time

From the terminal, type the following, but replace MM with the month (01-12); DD with the day (01-31); hhmm with the time (0000-2359); YYYY with the year (optional); and .ss with the seconds (optional).

date -s MMDDhhmmYYYY.ss

To make the change persist between reboots, sync the hardware clock with the updated system time.

hwclock --systohc

See Setting Date and Time for more discussion, including synchronizing with an NTP server.

Note: UNIX traditionally sets the system clock to GMT (UTC) or "Zulu" (Z time zone). So I use the stanza:

date -u MMDDhhmmYYYY.ss (well, I usually ignore the seconds)

Then I can set the local time using the techniques described elsewhere. iceworm

Accessing the microSD card

Mounted at /media/card by default.

 mount /media/card

If you have multiple partitions on the card, the first (/dev/mmcblk0p1) will be mounted at /media/card, the second at /media/mmcblk0p2, the third at /media/mmcblk0p3 etc. To setup the package management to write on the microSD card when installing new software follow the package management guide.

fox example :

Filesystem           1k-blocks      Used Available Use% Mounted on
rootfs                  252544    153560     98984  61% /
/dev/root               252544    153560     98984  61% /
/dev/root               252544    153560     98984  61% /dev/.static/dev
udev                      2048        76      1972   4% /dev
/dev/mmcblk0p1            3362      1794      1568  53% /media/card
/dev/mmcblk0p2          476382    157368    294419  35% /media/mmcblk0p2
tmpfs                    61928       380     61548   1% /var/volatile
tmpfs                    61928         0     61928   0% /dev/shm

Switching Keyboards

Fix default

Due to a bug, the default keyboard supplied on the 2007.2 doesn't allow you to enter the "/" or "\" characters, which should be on the same key (0?) as "+". You can instead add these characters to other keys, in this example ">" and "/" are added to the 1 key. You may also insert the tab character \t, which provides tab completion. The | character may also be useful. Edit /etc/multitap-pad/im-multipress.conf:

[keys]
KP_0 = +;=;/;\\
KP_1 = .;,;/;>;-;?;!;@;:;(;)
KP_2 = a;b;c;2
KP_3 = d;e;f;3
KP_4 = g;h;i;4
KP_5 = j;k;l;5;\t
KP_6 = m;n;o;6
KP_7 = p;q;r;s;7
KP_8 = t;u;v;8
KP_9 = w;x;y;z;9
KP_10 = A;B;C;2
KP_11 = D;E;F;3
KP_12 = G;H;I;4
KP_13 = J;K;L;5
KP_14 = M;N;O;6
KP_15 = P;Q;R;S;7
KP_16 = T;U;V;8
KP_17 = W;X;Y;Z;9

The buggy key is KP_0 in the above file.

The ; character is also missing. You can add this character by adding ;\; to any of the lines above.

Matchbox keyboard

Another keyboard is available: matchbox-keyboard. It is a full QWERTY keyboard. This howto is based on a blog entry which can be found here

Considerations

Pros:

  • All keys can be generated
  • Takes up less space than the keypad (multitap-pad), leaving more space for the application

Cons:

  • You pretty much have to use a stylus. With difficulty you can hit keys with the corner of a fingernail.

How to install it?

ScaredyCat release (http://buildhost.automated.it/OM2007.2/) or others distributions, use the following:

opkg remove -force-depends multitap-pad
opkg install matchbox-keyboard-inputmethod
opkg install matchbox-keyboard-im
opkg install matchbox-keyboard-applet

Otherwise, you'll have to download the ipk files from here. Assuming you have a working internet connection on your FreeRunner, you can do the following:

cd /tmp
mkdir matchbox-keyboard
cd matchbox-keyboard
wget http://www.ginguppin.de/files/keyboard-ipk.tar.bz2
tar -jxf keyboard-ipk.tar.bz2
opkg remove -force-depends multitap-pad
opkg install matchbox-keyboard-inputmethod*.ipk
opkg install matchbox-keyboard-im*.ipk
opkg install matchbox-keyboard-applet*.ipk
cd ..
rm -rf matchbox-keyboard

After that you'll have to restart the X server:

/etc/init.d/xserver-nodm restart

How to add a keyboard toggle button

To add a button to enable showing / hiding the keyboard, edit /etc/matchbox/session. In the list of applets after --end-applets, add keyboard, and restart your X server

How to switch between matchbox-keyboard and multitap-pad

If you want to keep the multitap keyboard, but also be able to start up the matchbox-keyboard, you can follow these ugly instructions:

First you must install matchbox-keyboard.

opkg install matchbox-keyboard

Do the following (from the terminal or an ssh session with DISPLAY=:0.0):

killall multitap-pad
matchbox-keyboard > /dev/null 2>&1 &

(If you type the above commands with multitap, you have to leave off the redirection of matchbox-keyboard output, since several of the keys you need are missing.)

Caveats: When you start the matchbox-keyboard, it stays up all the time. This will (among other things) prevent you from unlocking, since the keyboard covers the openmoko logo at the bottom of the lock screen. You will need to:

  1. nohup multitap-pad -d &
  2. killall matchbox-keyboard

to close it down, and at least get the matchbox keyboard going again. You should do that any time you're going to leave the neo alone for any length of time, so you can unlock it later.

To make sure you don't end up removing all your keyboard input capability, you can create a new .desktop file in /usr/share/applications/ for starting and closing the keyboard. This is pretty easy to do by copying and editing an existing .desktop file.

Modified Matchbox Keyboard: finger friendly

There is a modified Matchbox keyboard available on http://wiki.harnir.net/openmoko:keyboard-compressed . The keyboard can be controlled without stylus and also includes everything needed for terminal-use.

Installation

Download one of the files below, uncompress and put it in /usr/share/matchbox-keyboard/ on your Neo FreeRunner:

 * general keyboard layout DEAD LINK
 * Polish keyboard layout DEAD LINK

If you want, you can change the name of the file to keyboard.xml or make a symlink to it. This way, matchbox-keyboard will use it automatically after next restart of the X server.

Note: I've installed keyboard layout from [[1]] before making this one. Please inform me if my layout works without these modifications, or if they are needed.

How does it look like?

Default layout

Matchbox-keyboard-general.png

 * ^[ - Escape
 * ⇑ - Shift
 * ⌫ - Backspace
 * ⇔ - switch layout to the alternate
 * ^C - Control
 * ◆ - write a digit or symbol
 * ↵ - Enter

Default Polish layout

Matchbox-keyboard-pl.png

Shifted Polish layout

Matchbox-keyboard-pl-caps.png

 * ⇒ - Tab
 * ⇑⇑ - Caps Lock

If you use general layout, special characters from the top row stay the same in the shifted layout.

Digits and symbols

Matchbox-keyboard-symbols.png

When you select a desired key in this layout, keyboard immediately returns back to the alphabet keys.

Alternate keyboard layout

Matchbox-keyboard-alternate.png

This layout is "persistent" - when you select a key it won't disappear by itself - you need to use the <key>⇔</key> key in the bottom-left corner of the keyboard to return to the default keyboard.

Alternate layout is meant for easy writing of medium or long numbers (decimal or hex, hence the A-F letters), IP and MAC addresses, RGB values, etc. You can find here also direction keys (↑, ↓, ←, →) for easier movement operations.

Switch back to the original Openmoko keypad

If you for whatever reason need to switch back, here are the steps:

opkg remove matchbox-keyboard-inputmethod matchbox-keyboard-im matchbox-keyboard-applet
opkg install multitap-pad

Comment or delete the following lines in /etc/gtk-2.0/gtk.immodules :

#"/usr/lib/gtk-2.0/2.10.0/immodules/libmb-im-invoker.so"
#"matchbox-im-invoker" "Virtual Keyboard" "" "" "*"

Now restart the xserver:

/etc/init.d/xserver-nodm restart

Turning off the boot sound

To stop the boot sound playing simply edit /etc/pulse/session. Look near the bottom of the file, you should see something like:

# Load samples
load-sample startup /usr/share/openmoko/sounds/startup_openmoko.wav
load-sample touchscreen /usr/share/openmoko/sounds/touchscreen_click.wav


To disable the boot sound and/or the touchscreen tap sound simply place a # at the start of the line, ie:

# Load samples
#load-sample startup /usr/share/openmoko/sounds/startup_openmoko.wav
#load-sample touchscreen /usr/share/openmoko/sounds/touchscreen_click.wav


If you want to change the sound, simply change the .wav file name to something else.